NDI Quick Installation Guide
1. Login

1) Open Browser, for example, Google Chrome, and enter the IP address of the NDI camera: default “192.168.5.163”. Login with username and password: both are “admin”. Please select English in the upper right corner before you log in.
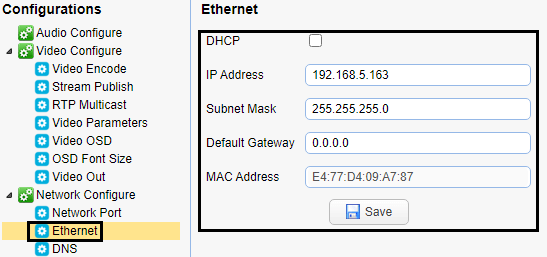
2) It is suggested for users change the IP Address of their camera. The camera has a default static IP address “192.168.5.163”. It is better to change the IP Address of the camera in the same segment as the network segment: make sure only the first three IP Address segment of the camera need to be changed, subnet Mask and Gateway is the same.
3) Extra: Check your Network IP segment. NOTE: Changing the IP address without talking to your network administrator may cause conflicts with the network. If the first three segments of the IP Address are changed to one already used, it will cause communication problems.
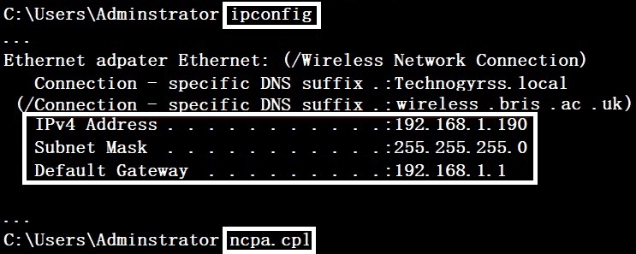
a. Check the IP Address segment of the network: press Win + R, then type CMD in the appearing window and press Enter key. You should see a black box pop up with the ability to type in the box.
b. If you type IP config in the black box and press Enter key, you will see a bunch of information pop up in your command prompt.
c. When you see an IPv4 address is your computer’s IP address on your current network. So, you would use the first three sets of numbers from this as your IP segment.
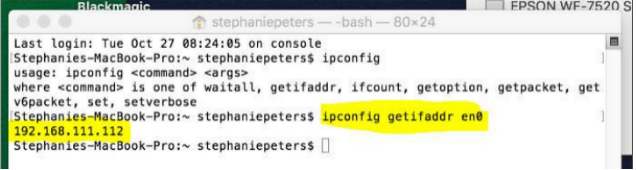
NOTE: If need to find the IP Address segment of the MAC computer, first open a new finder window and then go to Applications, and then Utilities. Program “Terminal” can be found in this menu and then select it.
Now, you would type in “IP config get if addr en0”. Once you type this string and click “Enter” on your keyboard you will receive back an IP address.
So, the IP segment of the network as shown in the picture below according to MAC is 192.168.111.xxx, which can be used to figure out the IP segment in which the camera needs to be set.
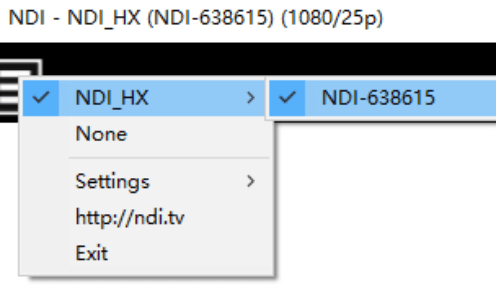
2. Enable NDI | HX on Admin Web page
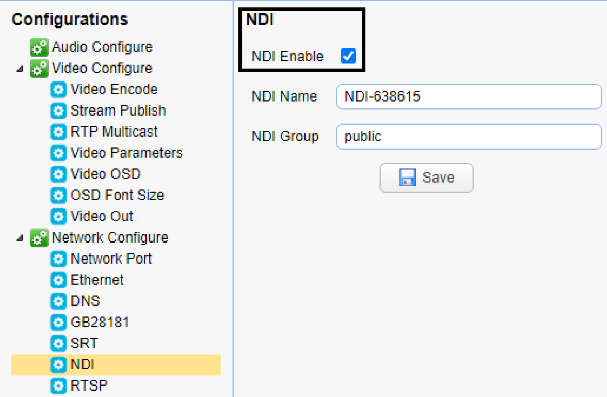
Log in on the web page by NEW camera IP address
3.Test NDI|HX Camera with NDI Studio Monitor
The software is available on NewTek website.
4. NDI|HX Camera Video Encode and Audio Configuration
Video Encode
High bandwidth mode: Main Stream
Low bandwidth mode: SubStream
Recommended Video Encode settings:
1920 * 1080: 4096 kb/s
1280 * 720: 2048 kb/s
640 * 480: 1024 kb/s
640 * 360: 1024 kb/s
320 * 180: 512 kb/s
320 * 240: 512 kb/s
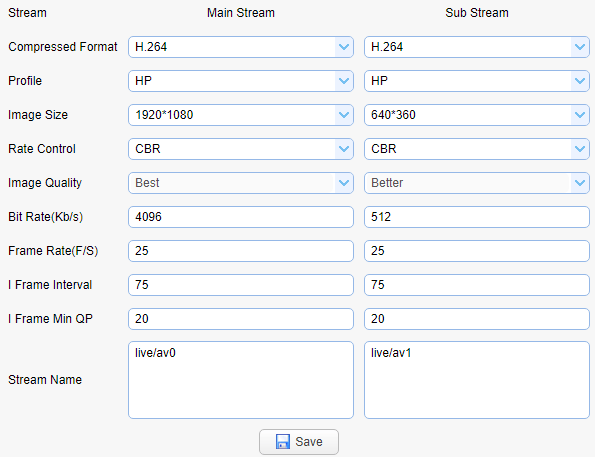
Note: The higher the Bitrate, the better the image quality.
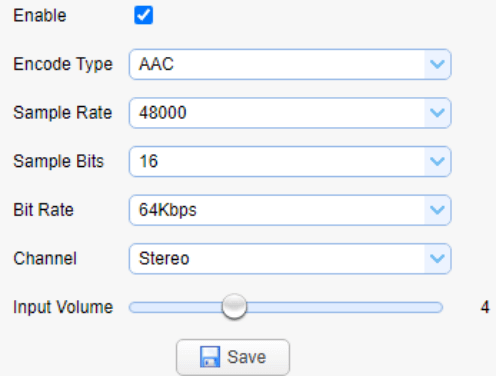
5. Audio Configure
Recommended audio settings: AAC 48000KHz / 64kbps
NDI | HX supports AAC format only
Notes:
- Users can switch according to different occasions with high and low bandwidth mode open at the same time.
The frame rate will affect the video latency. With the same resolution, the higher the frame rate, the smaller the delay of the video.
The HEVC (H.265) format will be supported by NDI|HX 4.5. The current version NDI|HX 4.0 only supports H.264.
The video frame rate is up to 60 frames. Open two streams at the same time at most.
To make sure the NDI video is smooth, please do not open another stream when NDI streaming is on.
SDI and HDMI video out are turned on by default. It’s recommended to adjust the Video Out Format to 720PX when you don’t need SDI/HDMI video. “X” represents the frame rate in 720PX.
To configure 60fps Video, Video Out Format must be set as 1080P60 or 720P60. Otherwise, the frame rate of the Video encodes part of 60 cannot be configured successfully.
Keep the frame rate of the video encoding part consistent or multiple with the video out.
Such as the Video encoding frame rate is 25, then set the video out format as 1080P25, 1080P50 or 720P25, 720P 50
The video encoding frame rate is 30, then set the video out format as 1080P30 or 720P30
Video encoding frame rate is 60, then set the video out format as 1080P60 or 720P60
6. NDI|HX Camera & vMix
Firmware requirement: vMix23 and above
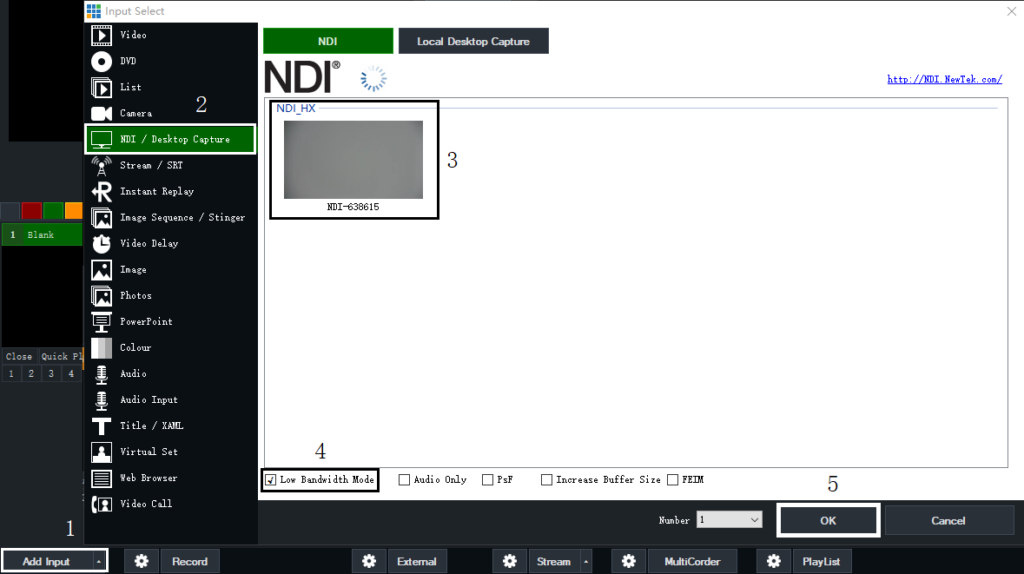
1) Open vMix23, add the NDI source Click “Add Input” on the bottom left of the vMix window and select “NDI/ Desktop Capture” in the appearing window, and then choose “your camera: NDI-XXXX”. Then select “Low Bandwidth Mode” and click “OK” to finish the adding steps.

2) Latency setting: the frame numbers are related to the frame rate.
Click “gear” on the upper right corner of the image. Select “Advanced” on the appearing window and type to change the default frame number “0”.
For example, if the frame rate is 25fps, then the frame data is 40ms, set the frame number as 5, so the network latency is about 200ms.
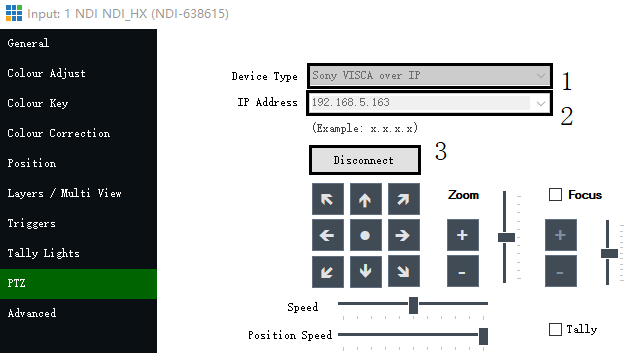
3) PTZ – Device type: Sony VISCA over IP – IP Address: camera IP – connect
Select PTZ on the same window as step 2, and then choose the right Device Type and IP Address. Click Connect, after which operate the camera by vMix.
7. NDI|HX Camera & OBS
1) Using the OBS, please download OBS-NDI plug-in via the link below, and install it.
https://github.com/Palakis/obs-ndi/releases/tag/4.7.0
Find more information about OBS-NDI here:
https://obsproject.com/forum/resources/obs-ndi-newtek-ndi%E2%84%A2-integration-into-obs-studio.528/
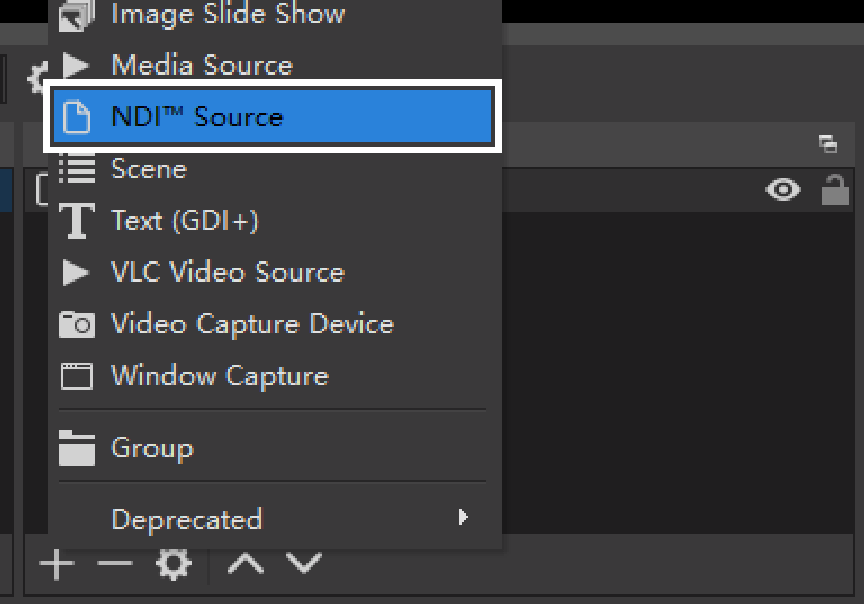
2) Add NDI source
Click “+” in the “Source” window at the bottom of OBS and select “NDITM Source” to add an NDI source.
Choose “Source name” in the appearing window and click “OK”.

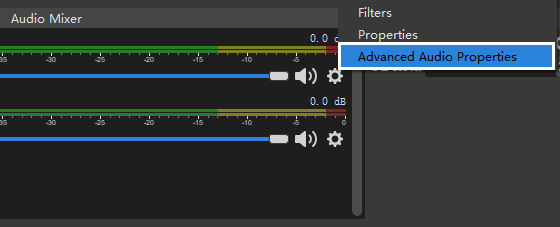
3) Enable Audio
Click the gear of NDITM Source in the Audio Mixer window. And then click Advanced Audio Properties and change Audio Monitoring to Monitor Only (mute output).

8. Q&A (Trouble Shooting)
Q: Big latency with vMix and NDI|HX camera.
A: 1. Latency is increased due to the cache configured on the client.
2. Set the frame rate to 60 to decrease video latency.
Q: NDI|HX camera latency.
A: The tested average latency is about 130ms, and the lowest delay is about 80ms.
With the following settings:
NDI|HX setting: 1920* 1080 | 4096kbs | 60fps;
Video out setting: 720P60
Testing software: NDI Studio Monitor (select low latency mode)
Q: How to modify network video and audio parameters on NDI|HX camera?
A: Please refer to the No.4 part (NDI|HX Camera Video Encode and Audio Configuration) on page 3.
Q: NDI|HX can search the source, but it can’t get the image.
A: Please refer to the No. 1 Part on page 2.
Q: Can’t get video out with vMix.
A: vMix23 and above firmware is able to output NDI|HX video.
Q: The video is frozen when I use NDI stream.
A: NDI signal transmitting is over IP/network, when the video is frozen, which means NDI signal is lost while network transmitting, so please make sure your network is stable. A good network will give you well performance.
How much Bandwidth does NDI HX use?
| Bitrate:
0Mbps |
Bitrate(Mbps) | Resolution | Frame Rate |
| Lowest | 0-6 | 640×360 | 30fps |
| Low | 7-8 | 1280×720 | 60fps |
| Medium | 9-12 | 1920×1080 | 30fps |
| High | 13-22 | 1920×1080 | 60fps |
