Record Video to Remote Server (NAS)
Connect MediDVR to a network via a standard Ethernet cable or connect to WIFI, users can
record videos “across the network” into a shared directory on a network drive. This section
describes how to set up the necessary network connections.
Getting Started
To configure the network, follow these basic steps:
Step1: Use an Ethernet cable or scan WIFI to connect MediDVR to your network (LAN
connection is on the back panel)
※ Enter Menu->Network->Wi-Fi to scan and connect WIFI.
Step 2: Through Menu->Network to check the network setting and ensure that the network
connection is successful. Step3: Plug a USB keyboard into one of the USB connectors (No
keyboard required if the network is configured via soft keyboard);
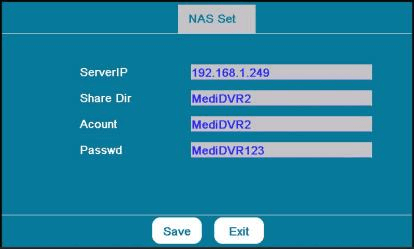
Step 4: Get the IP address of the NFS server (this article uses 192.168.1.249 as an example).
Notice:
Default share directory:
MediDVR2 Default
account: MediDVR2
Default password:
MediDVR123.
Supported Server Editions:
Windows 10 Home/
Professional. Windows 7
Home/ Professional, etc. NAS
servers such as Synology, etc.
Begin Configuration
1. Configure the SMB server
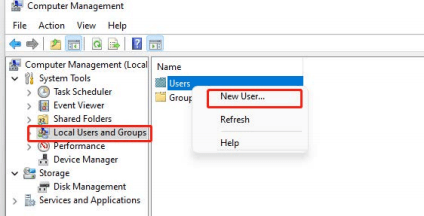
① Create a User Account
Right-click This PC (Computer) –Computer Management- Local Users and
Groups-Users-right clicks Users-New User.
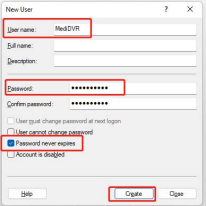
Type in a username (ex: MediDVR2) for the user account and a password (ex:MediDVR123), fill out any other details if you like, but do not forget to check the option that the password never expires. Click on Create when finished.
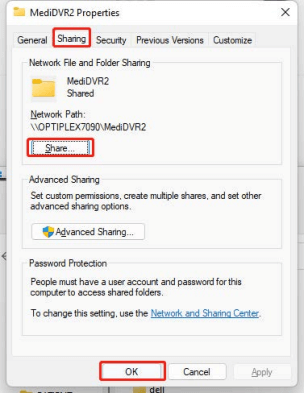
②Create a Share Directory on a PC
Step1: Create a new folder (ex: take MediDVR2 as folder name) on a drive you want (ex: drive D);
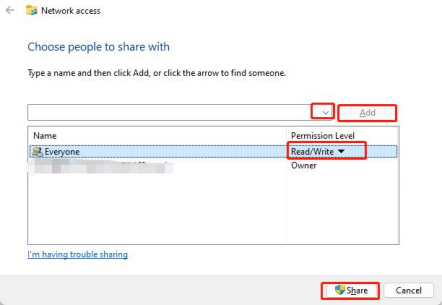
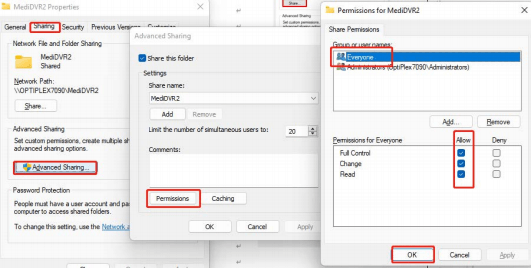
Step 2: Locate the shared folder-right click Properties-Sharing-Share-Sharing-Click on the inverted triangle in the input field-choose Everyone- Add-Read/Write-Click share.
Step3: Locate the shared folder-right click Properties-Sharing-Advanced Sharing-Permissions- Tick to allow.
③Test Share Directory
Step 1: Choose another computer in the same network segment.
Step 2: Use the shortcut key WIN+R to display the Run window.
Step3: Input: \IPMediDVR2. If users can open the folder successfully, then go on. If not, please ask the network administrator for help or see NFS FAQ.
※ The IP is the IP address of the NFS server. For this article, the input is \192.168.1.249MediDVR2.
![]()
④Install Windows Service
※ This section should be paying attention to win10 users, but for win7 users, it can be skipped.
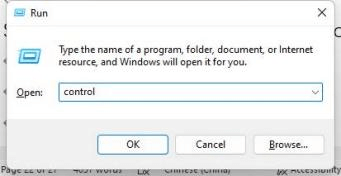
Step 1: Use the shortcut key WIN+R to display the Run window. Enter ‘control’ to call out the control panel.
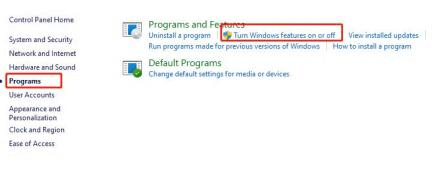
Step2: Control Panel-Programs and features-Turn Windows features on or off;
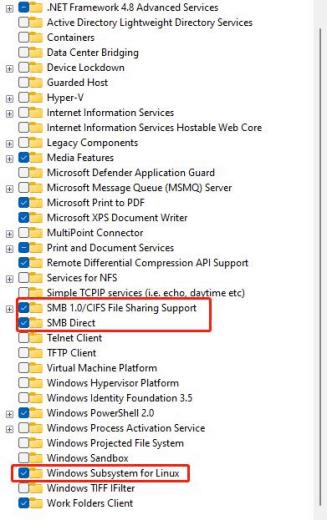
Step3: Check the option as shown below:
⑤Configure NAS
NAS doesn’t need any special setting, as long as the NFS account of MediDVR has Read/Write permission to share the folder.
2. Configure MediDVR
Step1: Press the Menu button or touch the Menu icon on the LCD screen to display the Main Menu, then enter the Record submenu, select the Storage tab and
choose NAS as storage;
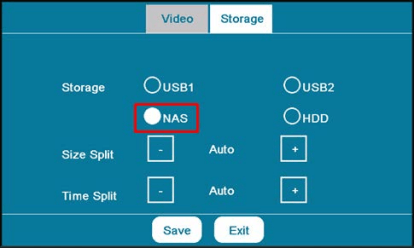
Notice:
※ After the setting is completed, select Save and exit the NAS setting interface, return to the storage interface, and select Save again. When you hear a beep, it means that
MediDVR has successfully recognized the NAS.
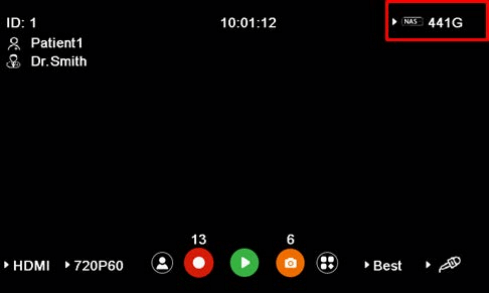
TEST NAS
Connect to the video source and choose NAS as storage, “NAS” will be shown on the top-right of the LCD window and Record LED on the front panel will become green. If a shared directory is empty, users need to input patient information. If recording video on the share directory can play normally, you have successfully completed the network connections setting.
NFS FAQ
1. MediDVR cannot connect to NFS server/NAS.
• Confirm Server IP, Account, and password are correct.
• Confirm shared directory of the NFS server is identical to the share Dir of MediDVR.
• Confirm NFS is connected through whether there are the words “NFS” are shown on
the top-right of the main menu.
• Ping the IP of the NFS server using another computer that is in the same network segment. If there
is no data packet dropout, then check out whether you have set the option that enables
folder sharing.
• If the NFS server is in windows10, check out whether you have installed Windows SMB and
Linux installed.
• Confirm directory has Read/Write permission.
• Folder name on MediDVR must not contain space or backslash characters.
• Check the network firewall and confirm that 111, 2049, and 4046 TCP/UDP port is open.
• NFS Server/NAS must be connected via a switch.
2. If recording video is not smooth, indicating that the network is not ideal, you can lower network broadband requirements or video recording quality.
3. When the MediDVR is restarted or disconnected from the network, the NAS will be disconnected. To reconnect, you need to enter the storage interface again and select the NAS.
When you hear a beep sound, the NAS connection is successful.
4. Make sure all settings are correct but still can’t connect to the NAS.
Use the LAN to connect to the Internet and enter the storage interface again and select the NAS.
After successfully connecting to the NAS, you can unplug the network cable and use the NAS normally.
