
PTZ Camera
How to restore camera to default setting
How to stream to YouTube & Facebook
How to connect with OBS & vMix(NDI models)
Which video formats does PTZ compatible with BlackMagic devices
How to change zoom speed
Unable to turn on your PTZ camera
How to change preset speed
How to pull stream through RTSP(VLC)
How to control your PTZ cameras by OBS
How to control your PTZ cameras by vMix
How to use PTZ NDI Camera connect Skype, Zoom
How to set VISCA/Pelco-D/Pelco-P protocol at PTZ Controller and PTZ Camera
How to restore camera’s default IP address in IR remote control
How does PTZ Connect to Bitfocus Companion
How to use ZowiePTZ and connect with X-Box
How to restore camera to default setting
How to restore to factory default via LAN
1. Log in the camera’s web interface. Go to Configuration>System Configure>
Default, click as P1 shows and restore to default.
2. Restart the camera.

How to restore to default via IR remoter
You can also use remote control and press [*] + [#] + [6] as P2 shows.
Note: it is limited to restoring the default settings of the remote control and cannot be restored the web setting.

How to restore to default IP via IR remote
All Zowietek PTZ cameras’ factory default IP address is 192.168.5.163, you can use remote control and press [*] + [#] + [MANUAL] to restore camera’s default IP address.

How to stream to YouTube & Facebook
To begin with, you need to connect the camera to the network and adjust it according to your own network environment. Please make sure that your PTZ camera, router, and computer are in the same network segment. For example, the IP address of your router is 192.168.1.1 and your computer IP is 192.168.1.222. You can set up the PTZ camera IP address to 192.168.1.163 through the web. (The default IP address of ZowieTek PTZ camera is 192.168.5.163)
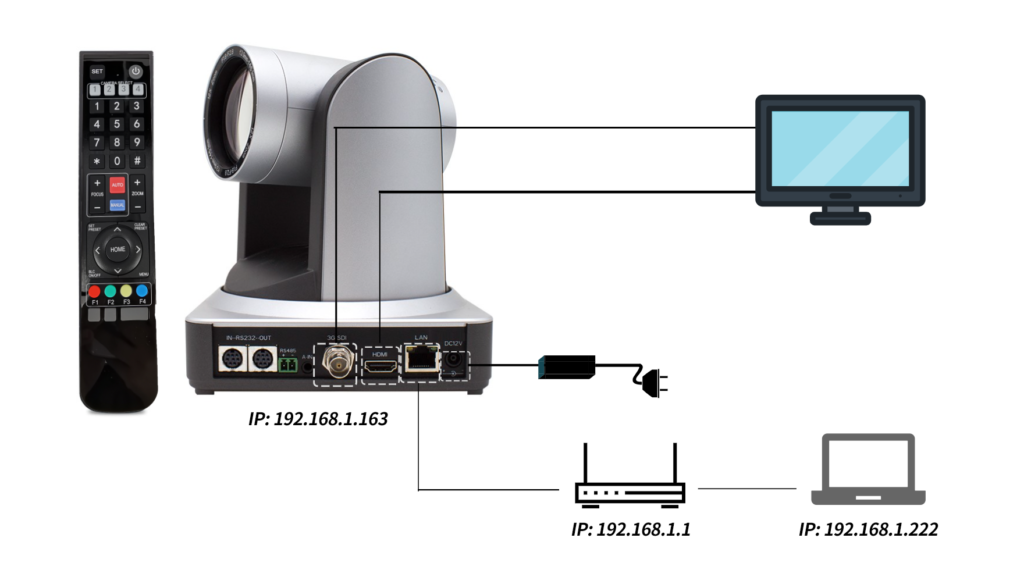
Step 1:
DNS Setting
Log in the camera’s web interface, you can choose DHCP
Camera web > Configurations > Network Configure > Ethernet > DHCP

Or set your own IP address and DNS.
DNS: Set the DNS IP the same as your router’s IP address, such as 192.168.1.1. Or set as a local public DNS address, such as 8.8.8.8 and so on, depending on your local region and area.
If you don’t know how to connect to the PTZ camera’s web setting in the browser, please refer to Quick Start Guide.

Step 2:
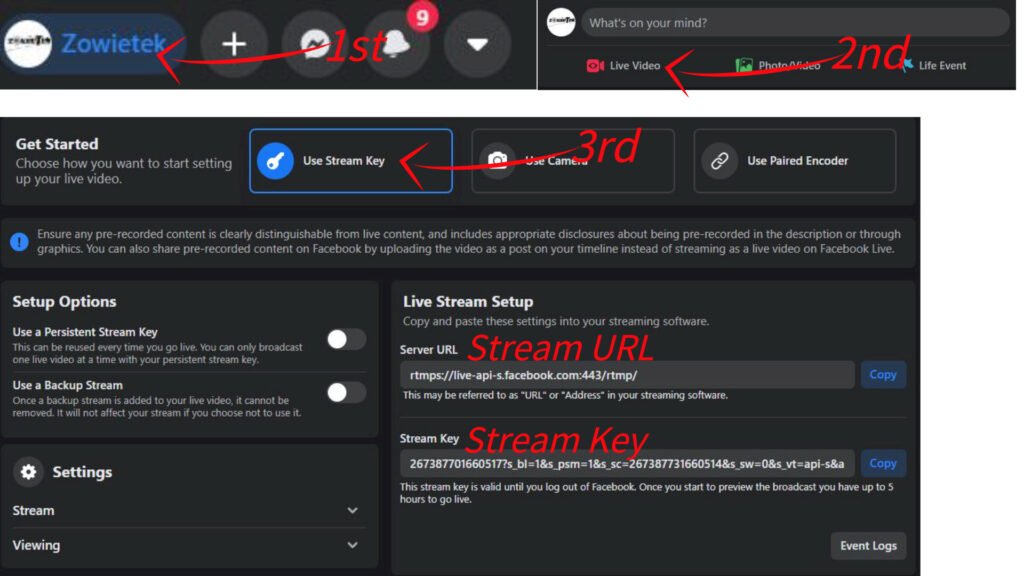
YouTube Stream
Click on the YouTube page in sequence as the picture shows and
get your Stream Key and Stream URL, which are essential to stream
set-ups on YouTube.

Go to Configurations>Video Configure> Stream Publish and use the information from Step 2 to set up your stream.
Use Stream URL for Host Address and Stream Key for Stream Name.
Don’t forget to change your Host Port to “1935” and click the “Enable” option.
Save your settings.

Facebook Stream
Click in your Facebook page as the picture shows to get your Stream
Key and Stream URL.
Go to Configurations>Video Configure> Stream Publish and use the information from Step 2 to set up your stream.
Use Stream URL for Host Address and Stream Key for Stream Name.
Don’t forget to change your Host Port to “443” and click the “Enable” option.
Save your settings.

Step 3:
Once you have saved all the settings above, your streaming on YouTube /Facebook starts immediately, so keep an eye on the stream page.
Notice: Youtube may need audio configuration to push stream properly.
If you cannot push the stream according to the above method, try to turn on the audio. If it does not work, please change Encoder Type to AAC according to the net steps:
Go to Configurations>Audio Configure>Enable Audio Configure>Save
In conclusion, setting up streaming needs at least 3 steps: log in to the camera’s web interface, get the info from the platform you want to stream to, use the info in the right section.

And here is an example of using Zowietek PTZ camera to set up stream to
YouTube. https://www.zowietek.com/wp-content/uploads/2021/04/Youtube例子3.mp4
How to connect with OBS & vMix(NDI models)
For OBS users
Step 1:
Folllow the steps in the picture on the right to add an NDI source in your
OBS interface.In the thrid step, you need to click on where the arrow points
to and use its listed option as the pictures shows.
Notice: You need to download OBS-NDI plug-in before adding an NDI source,
which does not come with OBS itself.

Step 2:
Save your settings in previous operations.Then click as the picturs shows to
input your Stream Key, which you can get by following the instruction above.

For vMix users
Click in vMix as the picture shows then you can transmis your NDI camera’s
images to vMix.
Notice: If you have various NDI sources, please select the one you need.
If you got here, then it means you have completed all the basic settings

Which video formats does PTZ compatible with BlackMagic devices
Video System Via HDMI
Video System Via SDI
")
")
How to change the camera’s Zoom Speed
You can use the IR remote: press “menu“è(P/T/Z)èZoom Speed, you can set the speed from 1 to 8.

Unable to turn on your PTZ camera
Check the buttom dial switch of the PTZ camera;
As shown on the right, which is USB3.0 Software
Upgrade Mode.
PTZ model: two DIP switches are set to ON or OFF
to select different modes of operation as shown in

Note: Working mode can be applicable for web upgrade.

How to change preset speed
You can use the IR remote: press “menu“è(P/T/Z)èPreset Speed, you can

How to pull stream through RTSP(VLC)
First, choose NETWORK for VLC media source. Then log in the camera’s web
interface, go to Configuration> Stream Publish, choose RTSP for Protocol
Type, the use Host Address and Stream Name to create an unique network
URL for VLC. Last, click play to start stream. Please refer to the
picture on the right for specific naming rules.

How to control your PTZ cameras by OBS
Step 1:
Download plugin. The plugin supports the VISCA serial, VISCA-over-IP, and PELCO-P protocols.
Step 2:
Download address: https://obsproject.com/forum/resources/ptz-controls.1284/download
Step 3:
Copy the patch to the OBSPLUGIN directory

Step 4:
PTZ Device Settings.

Step5:
PTZ Controls: click ”View” to ”Docks” , then click “PTZ Controls”.


How to control your PTZ cameras by vMix
Step 1:
Open vMix Software, click “Configure various Input settings”.

Step 2:
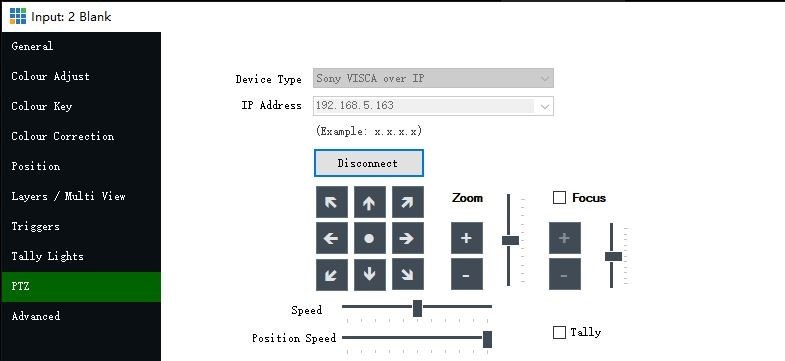
Select the PTZ device type that matches your camera from the “Device Type” dropdown box.
Entering in the PTZ camera network address, Then Connecting to the PTZ camera. Once the Device Type and Address have been selected click Connect to connect to the camera. If successful, the controls below the Connect button will be enabled.
Step3:
Input source set up.
Add input, Input/select URL.

NOTE: The URL setting must be consistent with the setting in WEB configuration of PTZ Camera.

How to use PTZ NDI Camera connect Skype, Zoom
First, if you have a PTZ NDI Camera, you should install NDI TOOLS, then running application, chooce NDI Camera Video source. As shown in the figure:

In the taskbar, select the “Webcam Input” button, click right key, Select the NDI HX device as the Webcam Input . For example : NDI-725761.


Skype setting:
check the version number, the number up 8.25.

Select “ Calling”–>“Advanced Calling” button, click “Allow NDI® usage “.

Set “Audio & Video”, select Webcam input source “NewTek NDI Video”.

Zoom Setting :
Open Zoom software and Login, then click button “Start Video”, chooce “NewTek NDI Video”.


How to set VISCA/Pelco-D/Pelco-P protocol at PTZ Controller and PTZ Camera
PTZ Camera setup:
NOTE: The PTZ camera remote control settings parameters must be consistent with the Camera Controller settings, otherwise the Camera Controller cannot control the PTZ camera. The addresses under different protocols can be the same or different, but under the VISCA protocol, PTZ camera address range: 1 to 7, under the Pelco-P/Pelco-D protocol, PTZ camera address range: 0 to 255.
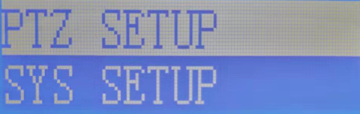
In normal working mode, press 【MENU】key to display the menu, using scroll arrow to point at or highlight the selected items.

Using scroll arrow to “Setup”, enter into “system setting”.
VISCA Address:1~7
PELCO-P Address :0~255
PELCO-D Address :0~255
Baudrate: 9600

PTZ Controller (90950-210) setup
PTZ Setup E.g. With address code 28, steps to change to VISCA/PELCO-D/PELCO-P protocol and baud rate to 9600 are as follows: Press【SETUP】button for 3 seconds under normal working mode, it displays as follows:

Enter password:
(default is 8888)
Press [Enter]

Press【2】【8】

Press【Enter】

Move joystick downward to choose the right protocol.

Move joystick rightward to choose the right BR(baudrate).
Then press 【ENTER】,there will be a 1sec beep sound when setting done.
Press【ESC】 3 times to back to normal working mode.
Note: Steps to set all devices to be with same protocol and baud rate are as follows:

Enter into the setup page

choose the corresponding protocol and baud rate. Then all devices within 0-255 addresses are set with the same protocol and BR(baudrate).
Universal PTZ Controller (90950-220) setup
VISCA Mode Setting
Control settings (set the baud rate for a certain address code):
Move the joystick up, down, left and right to switch addresses (1-7) → ENTER →Move the joystick left and right to switch baud rate → ENTER.
EX: Select the address: 1 → ENTER → Select the baud rate: 9600 → ENTER.
When the controller switch to address 1, the control baud rate is 9600.
PELCO Mode Setting
Control settings (set the baud rate for a certain address code):
Move the joystick up, down, left and right to switch addresses (1-255) → ENTER →Move the joystick left and right to choose protocols → ENTER →Move the joystick left and right to switch baud rate → ENTER.
EX: Select the address: 1 → ENTER → Select the protocol: Pelco-D → ENTER → Select the baud rate: 9600 → ENTER .
When the controller switch to address 1, the control baud rate is 9600, protocol is Pelco-D.
How does ZOWIETEK PTZ connect to BITFOCUS COMPANION
Note :Bitfocus Companion does not necessarily require Stream Deck to use!
How does the Companion accept control commands? Take web-side control as an example Method: Use the web terminal (accessed through mobile phone, pad, computer) to control.
1.Download. https://www.bitfocus.io/companion/
2. Installation, configuring the Network, before you open Companion.
• Connect the hardware and software you want to control. Make sure you are on the same network as they are.
• In the Elgato Stream Deck app, make sure to firmware upgrade the Stream Deck to the latest version available.
• Close the Elgato Stream Deck app. Companion will not find your device if this is open.
After running the program, this window will pop up. Companion is based on web pages, which means that after installation, if the network card and port are set in the GUI Interface drop-down menu, you can access Companion through any computer in the local area network. (It is not necessary to configure Companion through the computer where Companion is installed)
3. Start the server when you open Companion, a server window will open. From the opening screen, choose your network interface and change the port if needed – the default is 8000. This is the port of the Companion server.
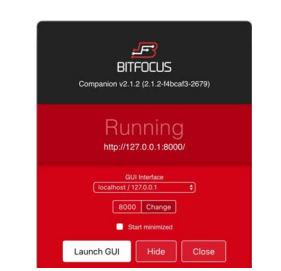
Companion should be running on the same computer that the Stream Deck is connected to. It can run on the same machine as it uses minimal resources. If you need to remotely control Companion from other computers on the same network, use the URL under the text “Running”. Normally, to configure Companion from the computer you’re running it on, click the Launch GUI button, it will open the admin page in your default browser. We recommend using Google Chrome.
4. Configure the controlled device and pair the controlled device to the Companion
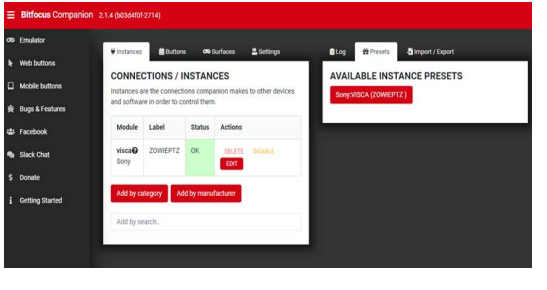
First, we need to make sure that the controlled device has been connected to the local area network, set a fixed IP address, and the official control software or web interface of the device can be used normally on the connected local area network. We need to note down the IP address of the device. Here is an example of adding ZOWIEPTZ CAMERA. We enter the device brand in the text box, search for and add the device. Click on the blue underlined part.

Click on the Instances tab to see the devices that have been added.

If the Status shows green OK, the Companion has successfully connected the device.
5. Configure the control “button”
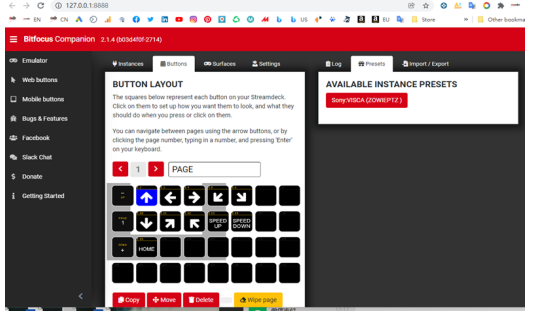
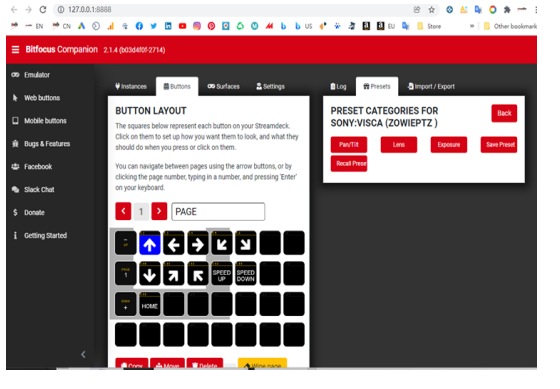
5. Test if the button is functional Press button <Test actions>, Whether the test function is implemented

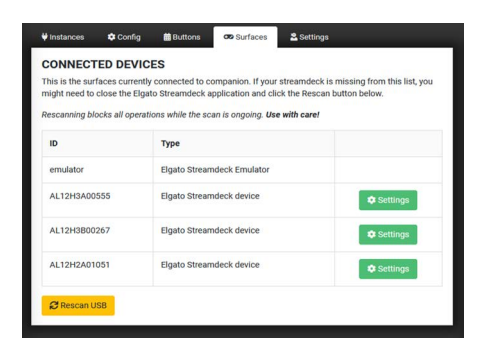
6. Surfaces This tab will show the connected Elgato Stream Decks. If any of your Stream Decks are not showing up, press the Rescan USB button. Use with care as rescanning will block all operations while the scan is ongoing.
How to use ZowiePTZ and connect with X-Box
Preparation
1. Host Configuration
Cpu: i7 seven generations or more
Memory: above 8G
Graphics card: no specific requirements
Operating system: 64-bit windows operating system 2. LAN connect to all cameras
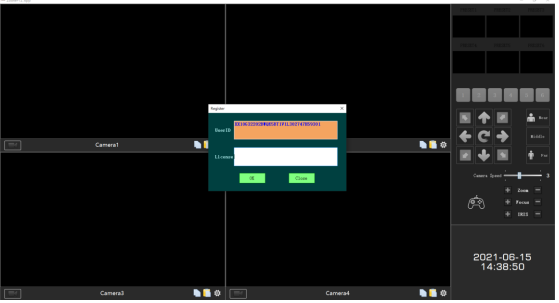
Software registration
1. Double click the camera control program

2. Software registration, enter the license, click “OK” to complete the activation ( please send the user ID to Amazon message center to get the license.)
Interface function introduction
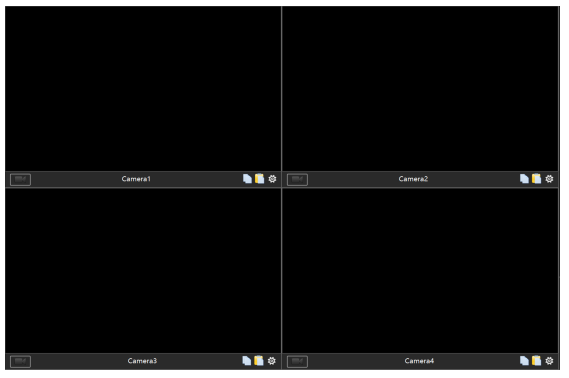
Part 1: Signal source display area
Part 2: Preset position area
Part 3: PTZ control area
Part 4: Camera control area Part 5: System time display area

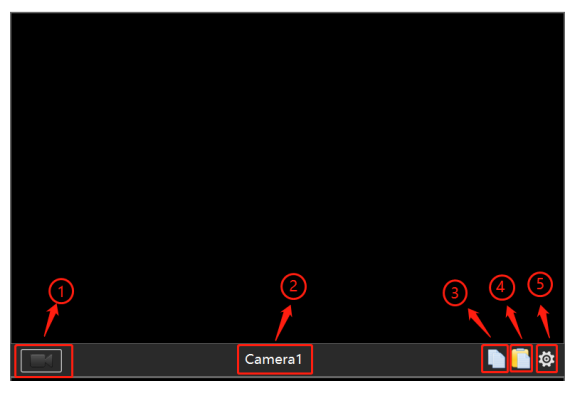
Signal source channel introduction
1. The record button; it can record the video.2. Camera name
3. Copy (copy the current camera’s setting)
4. Paste (paste the camera’s setting) 5. Set up the Camera’s information
Camera information
Click the “set up” then enter the right information Camera Name:you can set the camera nameCamera IP:Camera’s IP addressVISCA Port:Camera’s Visca Port(PTZ control port)VISCA Address: Camera’s Visca’s addressStreaming: Camera’s RTSP pull address’Run: Camera start buttonStop: Camera stop buttonClose: close the set up page

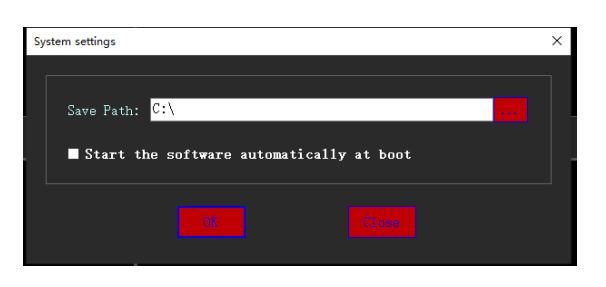
Recording file storage directory setting
Right-click and select “System Settings”, click the “…” button to set the storage path, and click “OK” to s
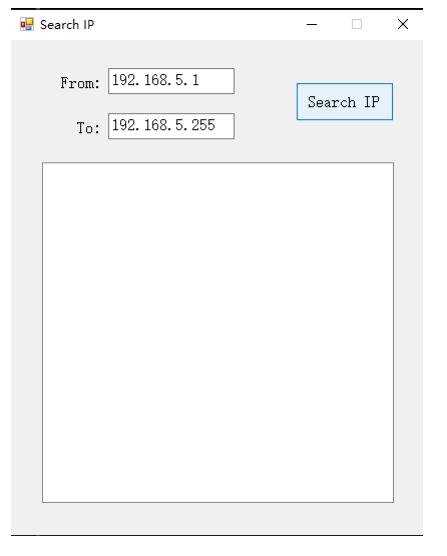
Search IP
Right-click and select “Search IP”, click the “Search IP” to check the IP
Switch the 9 Channels / 4 Channels
Right-click and select “Switch to 4 Channels”, and restart the App.
Preset Position
1. After confirming the preset position by the PTZ direction keys, long press the “1” button to save the preset position
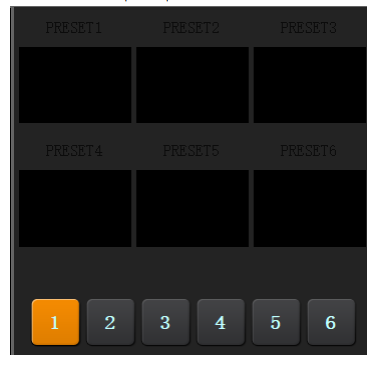
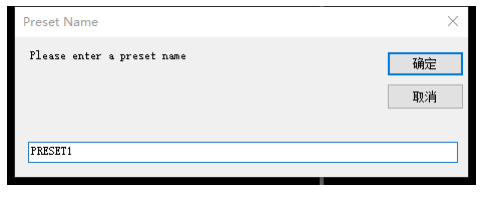
2. You can double click to change the preset position name
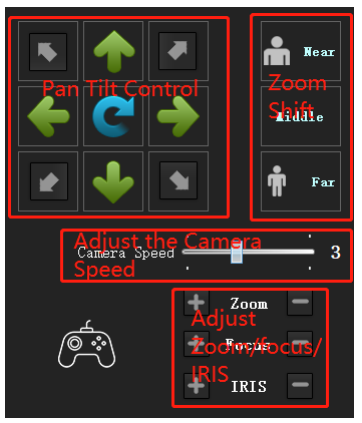
PTZ Control Area
PTZ Control: adjust the direction of PTZ cameraZoom Shift: one button shift Near/Middle/FarCamera speed: PTZ speed adjust from 1 to 6Zoom: Adjust the zoom of cameraFocus: Adjust the focus of cameraAperture: Adjust the aperture of camera
External X-Box for camera control
After the X-Box is connected to the computer USB port, you can use X-Box to control the camera directly

Click here
