-
General FAQ
-
4K Video Encoder/Decoder
-
- How to supply power for ZowieBox?
- How to set up ZowieBox to connect with my equipments?
- What is the login account and password of the ZowieBox?
- My computer can't find ZowieBox at NDI tool, what should I do?
- How to set the IP address for ZowieBox?
- How to change device name?
- How to manually update firmware for ZowieBox?
- How to connect with Nintendo Switch?
- How to reset ZowieBox?
- Will this save the settings after being disconnected from power?
- If I didn't have LAN, how can I visit ZowieBox?
- How to connect with PS5/4 ?
- How to connect with X-Box Series?
- How to use cold shoe?
- Does ZowieBox support PoE?
- Instructions for NDI over WIFI
- Show all articles ( 1 ) Show all articles
-
- How to upgrade with USB
- Does ZowieBox support saving video files to local disk?
- Does ZowieBox support multicast transmission?
- Is it possible to decode the NDI® stream emitted by another device using ZowieBox ?
- What is the latency from encoding to rendering when using ZowieBox to transmit 4K30 signal?
- Can in record to usb and encode at the same time?
- How to use Tally light?
- Device is hot, will it has any problem?
- Does ZowieBox support OSD?
- What is the latency from encoding to rendering when using ZowieBox to transmit 4K30 signal?
- Would this be usable by a gaming console? for example, is the HDMI passthrough (with no latency) while recording to YouTube?
- Does it support power pass through? Meaning can the ZowieBox accept or provide power through the USB-C?
- Can ZowieBox switch to a still image? Like jpeg that says be right back?
- How to switch to NDI mode
- Can it get multiple NDI feeds as input?
- How to switch to Decoder mode?
- How can I use ZowieBox connect to PTZ Camera?
- How to switch HDMI loop out and output?
- If ZowieBox didn't connect LAN, how can I control the record function?
- How can I power for Monitor or PTZ Camera by ZowieBox's DC out?
- How can I use X-Box to control the PTZ Camera via ZowieBox?
- How to use video recording
- What video formats can ZowieBox create?
- How do I fix the no signal problem when capturing a 4KP60 video from PS5?
- If nothing is captured on the preview screen, what should I do?
- If you use a 3.5 plug input for audio, will that audio also pass through the HDMI output?
- How to use ZowieBox connect to Zoom?
- How to set parameters when ZowieBox detects the computer signal source as wrong resolution or unsupported resolution
- How to use NAS to save video file
- What is the WiFi for?
- Can I use NDI over WIFI?
- What USB dongles does ZowieBox support?
- No Ethernet Port on Laptop, how to extend ethernet to use NDI?
- How to perform point-to-point video transmitter and receiver by Lan
- How to perform point-to-point video transmitter and receiver over the Internet
- Video file can not be viewed online
- Get RTSP streaming URL
- FEELWORLD L2 Plus Multi Camera Video Mixer Switcher output cannot be detected
- Why is not ZowieBox decode NDI source from VLC, NDI, OBS, etc. supported?
- Why doesn’t ZowieBox recognize Mac mini’s signal?
- How to use SRTMiniSever for streaming
- How to discover ZoiwieBox’s NDI using OBS’s NDI plugin?
- How to modify AMD graphics card parameters to make ZowieBox output normal
- Recommendations for storage device speed
- How to switch output resolution in decoder mode
- How to decode/encode SRT to ZowieBox using vMix
- How to recover ZowieBox if it works abnormally after the upgrade
- Why 4K60/4K50/1080p120/1080p100 input is recognized as 1080p60/50 input?
- The difference between New Gen ZowieBox and ZowieBox
- How to Decode NDI Source
- Show all articles ( 35 ) Show all articles
-
- Does ZowieBox supports multicast transmission?
- Can ZowieBox stream to multiple destinations at once?
- Is it possible to decode the NDI® stream emitted by another device using ZowieBox ?
- Does this device support RTMP(S), the secure RST that facebook is now requiring?
- How to use ZowieBox stream to YouTube
- How to use ZowieBox stream to Facebook?
- How to use ZowieBox stream to Wowza
- Can it store multiple steam keys for YouTube?
- How can I solve image and sound out of sync in OBS?
- How to get ZowieBox working in the OBS?
- How to get ZowieBox's video in vMix?
- Do you have to create an event on Facebook and YouTube before every stream or one key works every time if i plug it in the encoder?
- How to stream to Twitch?
-
-
Medical Video Recorder
-
- What are the recommended USB device specifications?
- How to set the MediDVR clock
- Set the size and time of video clips
- How to capture the still images during video recording
- How to manually select the video source
- How to select the audio source
- How to playback the videos just recorded or stored on the MediDVR
- How to pull stream to view live video
-
- Brief description of the MediDVR
- What video resolutions are supported?
- Set up the video input and resolution on the MediDVR
- Output formats supported by the MediDVR
- How to find the version information on the MediDVR
- How can I search patient data?
- Is it possible to playback / edit the video file on a computer?
- Troubleshooting
- What is DICOM?
-
-
PTZ Camera
-
- How to upgrade with USB
- Does this camera need the power adapter if I use a POE switch?
- How do I set the PTZ camera to be on my network?
- How to restore factory defaults
- How to restore camera's default IP address,username and password in IR remote control
- How to use PTZ NDI Camera connect Skype, Zoom
- How to find PTZ IP address
- How do I connect Mac PC to the PTZ camera?
- How do I change the IP address of PTZ Camera?
-
- IR remote control shortcuts
- What are the possible ways I can control my PTZ camera?
- If I set a preset using the remote control, can I call that preset from the IP interface?
- Installing the OBS plugin to your windows PC to control PTZ camera by OBS
- How to get PTZ NDI Camera working in NDI
- How to use STREAM DECK to control the PTZ camera
- Supporting Xbox Joystick control
- How to control your PTZ cameras by vMix
- How to set VISCA/Pelco-D/Pelco-P protocol at PTZ controller and PTZ camera
- How to control PTZ Camera by ZowiePTZ
- How to control PTZ camera by BITFOCUS Companion
-
- How to feed RTSP from ZOWIETEK PTZ cameras into some commonly used video mixing software (OBS, vMix)
- RTMP live streaming to YouTube with PTZ camera
- RTMP live streaming to Facebook with PTZ camera
- How do I stream to YouTube live with vMix?
- How do I use OBS to push streams?
- How do I use vMix to pull RTSP streams?
- How to pull stream through RTSP(VLC)
- How to get PTZ cameras’ videos in vMix
- How to get PTZ cameras working in the OBS
-
AI PTZ Camera
-
- How to upgrade with USB
- How to use PTZ NDI Camera connect Skype, Zoom
- How to restore factory defaults
- How to restore camera’s default IP address,username and password?
- How to find PTZ IP address?
- Which video formats does PTZ compatible with BlackMagic devices?
- How to update the new firmware
- Does AI Tracking Camera supports ZowiePTZ?
- AI PTZ Camera(1080P Version) - HDMI & SDI output delay
- How to upgrade the firmware at MAC OS?
- How do I connect Mac PC to the AI PTZ camera?
-
- How to get PTZ cameras working in OBS
- How to get PTZ cameras’ videos in vMix
- RTMP live streaming to YouTube directly from the AI PTZ camera
- RTMP live streaming to Facebook directly from the AI PTZ camera
- How to feed RTSP from ZOWIETEK PTZ cameras into some commonly used video mixing software (OBS, vMix)
-
PTZ Controller
-
- Quick Start
- Setting up your PTZ Network Controller
- How to search the camera by ONVIF
- How to set preset and call preset?
- How many presets (max) per camera can you set up?
- Can the controller be turned off when using POE?
- When the PTZ camera is mounted on the ceiling, I go right with the joystick the camera goes left and when I push the joystick to the left it goes. How can I fix this problem?
- Will this viewer work with 4k camera system?
- Does this controller support VISCA over IP ?
- Does the RS232 and RS485/422 work on this controller?
- Can the gateway IP address be changed?
- I tried to connect in the network but the Gateway IP address and DNS server could not be changed. Could you tell me how to change them?
-
Streaming Encoder
-
- How to upgrade with USB
- How to get a RTMP(S) URL?
- How to update the firmware?
- What cameras are compatible with the LiveV400?
- What platforms can I stream to with LiveV400?
- What resolutions and framerates can the LiveV400 stream?
- What to do if the video is not clear
- Is the LiveV400 supposed to run hot?
- The sound of the fan of LiveV400 affected me, how to solve this problem
- Does the LiveV400 support OSD?
- Is device video collage supported?
- How to get LIveV400’s Serial Number
-
- Which bands(frequencies) does the LiveV400 support?
- Which 4G(LTE)USB dongle does the LiveV400 support?
- How to connect the LiveV400 to the internet
- The most important step to use the built-in 5G/4G(APN setting)
- How to bond
- Can the LiveV400 stream to multiple destinations at once?
- How to aggregate the network to make the live more smooth
- Preparation before pushing the stream
- How to use SIM card to connect to the network?
-
Surgical Video Camera
-
- How to connect the surgical video camera to my device?
- NDI Tool cannot search for the 4k surgical camera?
- How to supply power to the surgical camera?
- what is the login account and password of the surgical camera?
- How to reset the surgical camera?
- How to use the surgical camera?
- How to push streaming?
-
-
4K POV Camera
-
- ZowieCam operating temperature
- How to use OSD menu to adjust output resolution
- How to use Tally Light
- How to use shortcut functions
- How to use button to operate OSD menu
- How to check ZowieCam’s IP Address
- How to adapt the button direction to the output direction
- How to perform noise reduction
- How to flip the encoding screen
- How to flip the output screen
- How to set up when the color is incorrect
- Why sometimes using the OSD menu to modify parameters is not effective?
- How to record videos with ZowieCam
- How to switch to standby mode
AI PTZ Camera Quick Start
Preparation
Inside the box, please find
1) PTZ Camera
2)Power supply and power cord
3)Remote control
WARNING: Don’t move or rotate the camera by seizing the camera head.
You also need
1)Two AAA alkaline batteries for the remote control
2)Video monitor with HDMI input, or SDI input
3) RJ45 LAN cable.
4) PC or Laptop.
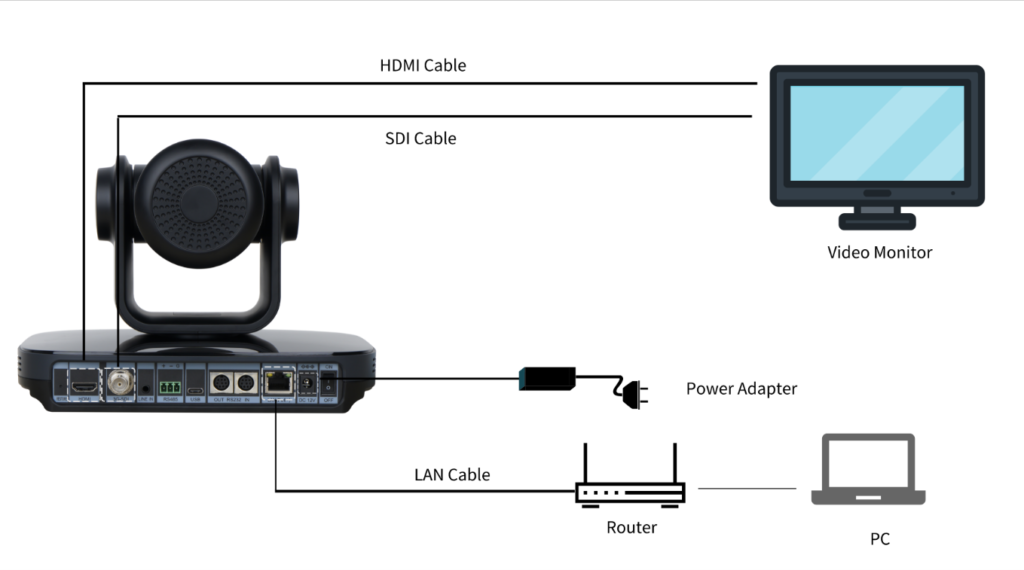
Connection
Connect HDMI output as the diagram to video monitor. If you are professional and have an SDI monitor, you can also try connecting the SDI output to the video monitor instead.
Power on
Connect the power supply, no power switch. Instantly, you will see the camera starts to rotate to its default parking position of the front middle.
A LED in front will be in RED flash and turn to stead GREEN in a couple of seconds.
You will see crystal and beautiful video pictures on the monitor.
Note: If no video picture, please
1) Check power supply. Make sure the front LED turn on.
2) Check cable connection and make sure the input video source of the monitor is set correctly.
Control the Camera by Remoter
Put two AAA batteries inside the remote control. Point to the front of the PTZ camera. Use the four arrow buttons to control the pan and tilt. Press HOME always park the camera in the front middle anytime.
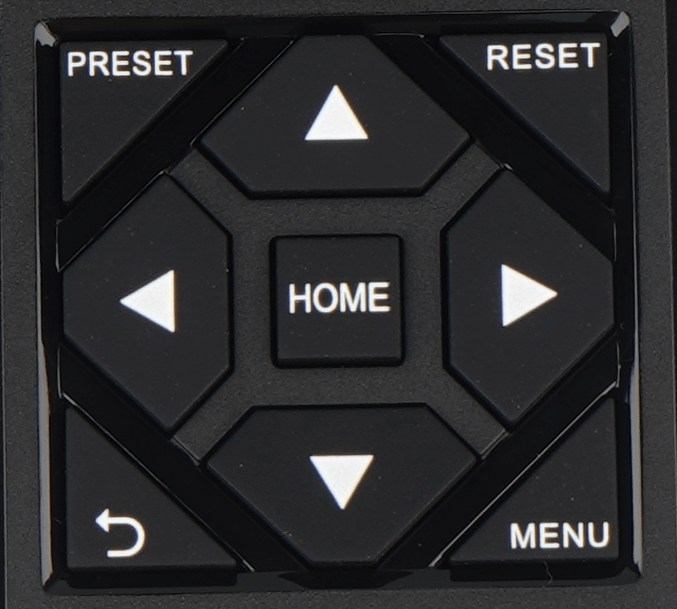
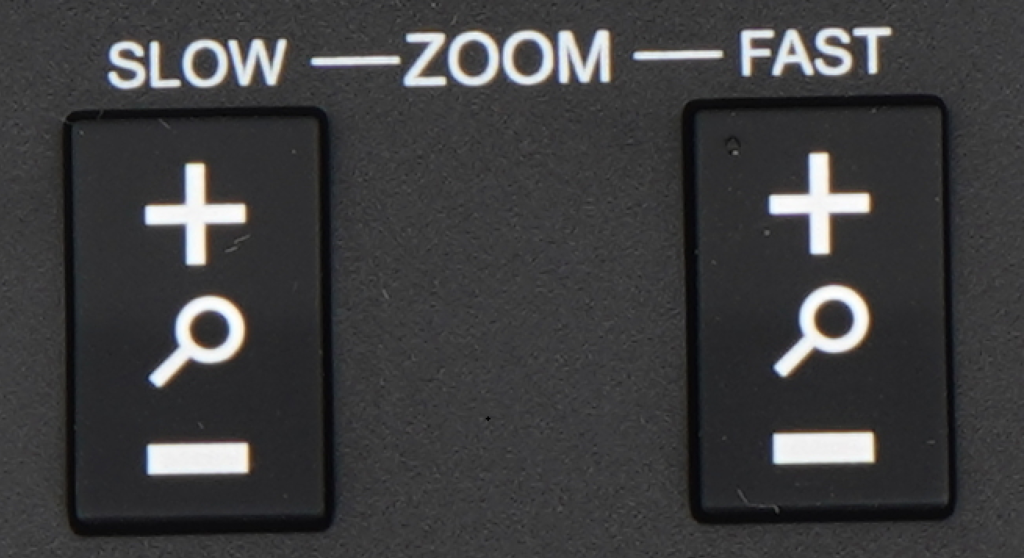
Press ZOOM +/ – to change far/near.
Press MENU to set up the camera.
Control Camera by Network
Connect the LAN port of the camera to the router or switch.
Change the PC IP setting
Note: The pictures below are used for reference only, please set them according to the actual network condition. IPv4 Address 192.168.1.190 is used as an example, the last segment could be different.
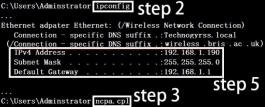
1) Press Win + R, then type cmd and Enter.
2) Type IP config in the window and Enter.
3) Type ncpa. cpl in the same window and enter.
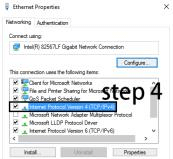
4) Right-click Local Network connection and select Properties, then double-click Internet Protocol Version 4 (TCP/IPv4).
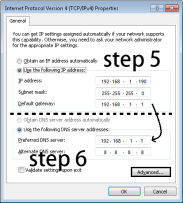
5) Type in the IP address, subnet mask, and Default gateway found in step 2.
6) Use default gateway as the Preferred DNS server address and 8.8.8.8 as the Alternate DNS server.
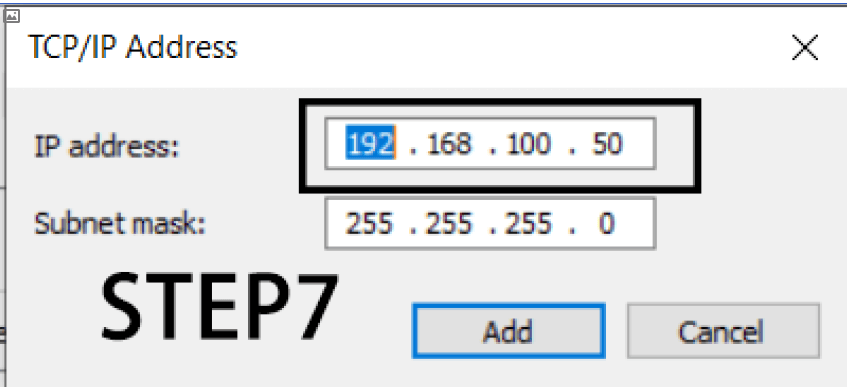
7) Click Advanced. Add a new IP address, whose first three segments are the same as the camera factory default IP address (192.168.100.88). Type 192.168.100.50 for example. The subnet mask remains the default.
8) Save settings.
Web login and control
Now, you can access the camera, open the web browser, type IP address 192.168.100.88, then Enter to go to the camera login page.
User name: admin Password: admin
At this time, you can see the preview of the camera video. Do the pan, tilt, and zoom control via LAN. .

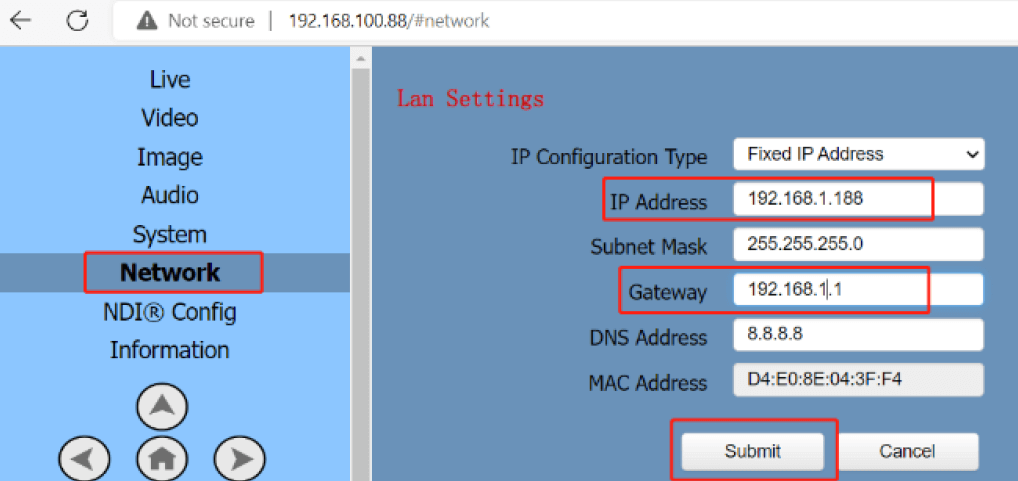
Change the IP of the camera
For future convenient, change the IP of camera to the same IP segment of your LAN, for example 192.168.1.188. The Gateway also needs to be changed as follow: 192.168.1.1. Then, click Submit. Restart the Camera.
Note: Above IP address cannot be the same as any other computers or devices in the LAN. Ifforgetthe IP one day, and note that it will show on the left- top corner of the video in seconds when power is on each time